
If you are a newbie to ASP .NET Core and looking for a step-by-step explanation of integrating a text editing tool with your newly created ASP .NET Core MVC web application and saving the text in the database, you are going to read the right article.
In the following article, I will explain how the most popular text editing tool ‘CK Editor’ is integrated with an ASP .NET Core MVC web application. The text generated by the CK Editor will be saved in a Microsoft SQL database. Here also I will employ the Identity UI framework for user authentication in the web application.
The content is as follows:
- Create ASP .NET Core MVC Web Application (Code First).
- Create the database (Microsoft SQL).
- Download and extract CKEditor.
- Integrate CKEditor with the web app.
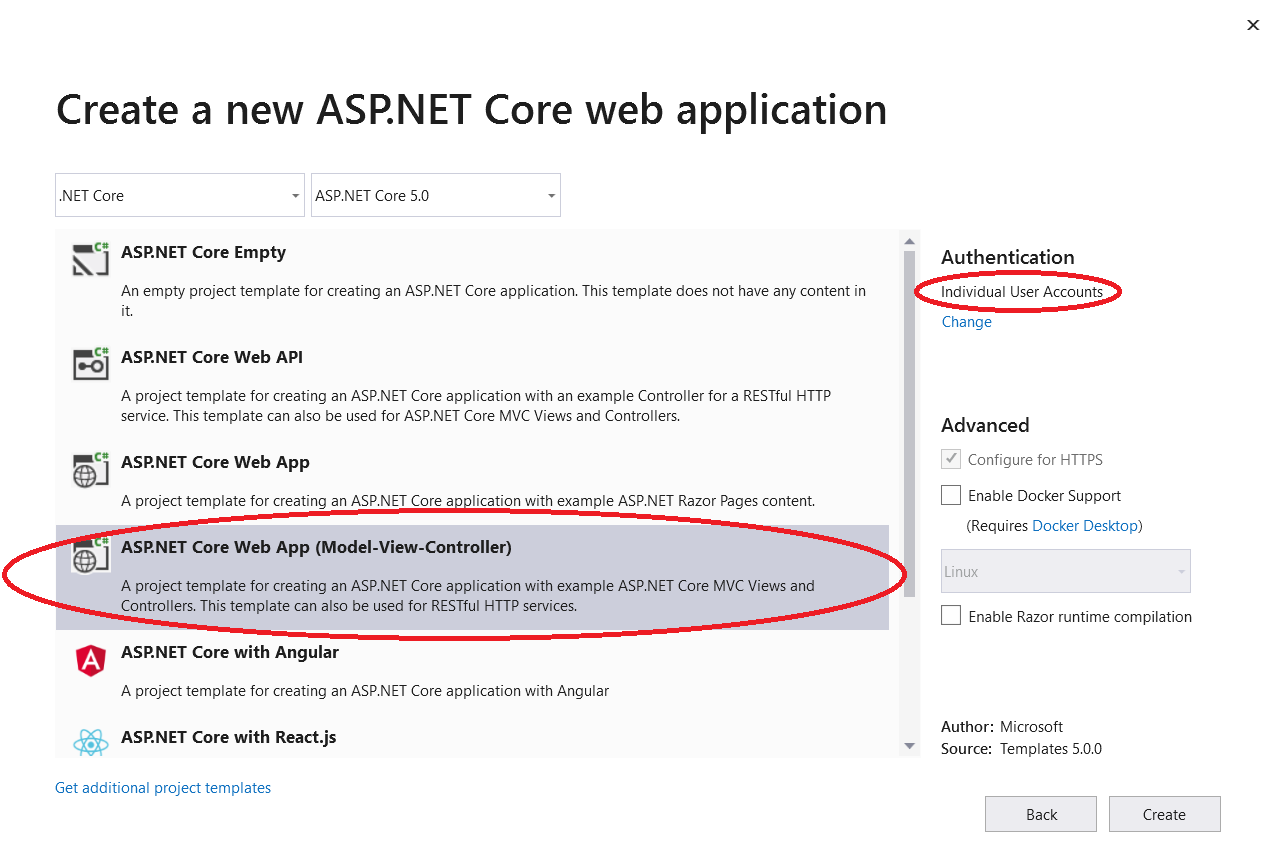
1. Create ASP .NET Core MVC Web Application (Code First)
Create your model classes for the ‘User’ (ApplicationUser.cs) as follows: (Remember the application user must inherit from the Identity User. Then all the attributes relevant to the Identity User also inherit to the application user.)
Next, create the model class for the text document that is generated from the CK editor. I have named it ‘UserArticle.’ The fields to save the article Id, the Id of the user who wrote the article, the title of the article, the description, and the date-time the article is stored in the database are included in the model class.
2. Create the Database
Then it is necessary to update the database context class (ApplicationDbContext.cs) to eventually create new migrations and the database. Finally, you can annotate the primary keys, foreign keys, and attributes’ parameters of the entities within the database context class.
The ‘ASPNetUsers’ entity created by the ApplicationUser model has an ‘autogenerated string’ as the Id, and the entity ‘UserArtilcle’ created by the model ‘UserArtilcle’ has an auto-incrementing integer type Id. The date-time of the files uploaded is automatically inserted into the table.
Having modified the database context class, now you can create migrations. First, delete the available migration folder with its content and run the following command in the NuGet PackageManger console.
add-migration CKEditor-ASP.NETCore-Migrations‘CKEditor-ASP.NETCore-Migrations’ is the name of the migration file (you can change it as your wish). The above command will create a new set of migration files. Now you can update the database. Before that, you have to take the database connection string to your Microsoft SQL database.
Then update the appsettings.json file as follows:
Now run the following command in the NuGet PackageManger console to update the database and create the tables (Fig 02).
update-database
3. Download and extract CKEditor.
The official CKEditor website states that “CKEditor is a WYSIWYG rich text editor that enables writing content directly inside web pages or online applications.”
Go to the download page and download the required version of the CKEditor: Here, I download the ‘Full Package’ of CKEditor v4.16.0, released on 26–01–2021. You can download any package according to the requirement, and even you can customize the tools according to your preference and download the package from the final option ‘Customize’ (Fig 03).
Download URL: https://ckeditor.com/ckeditor-4/download/

Then extract the content and paste the extracted ‘ckeditor’ folder under the ‘js’ folder of ‘wwwroot’ directory.

Next, we will integrate the CKEditor with the .cshtml view of the web application.
4. Integrate CKEditor with the web app
The final step is to modify the codebase to integrate the CKEditor into your web application.
To integrate the CKEditor with the .cshtml view, you have to import the CKEditor JavaScript library as follows:
We are using the model UserArticle to write the data into the database tables. Therefore ‘UserArticle’ model is used in the .cshtml view. Next, the CKEditor JavaScript library must be imported as follows:
<script src="~/lib/jquery/dist/jquery.js"></script>
<script src="~/js/ckeditor/ckeditor.js"></script>
The ‘id’ attribute of the <textarea> tag should be ‘Description’ which is the property of model ‘UserArticle’ to store the article content as a markup string.
Finally, use the following jquery to load the CKEditor to the text area:
$(document).ready(function () {
 CKEDITOR.replace(‘#Description’);
});
The complete .cshtml view is as follows:
Now, everything is set up correctly, and you can successfully write articles with different text formats and save the content in the database.
source: https://enlear.academy/integrate-ck-editor-to-asp-net-core-mvc-web-application-239b2cd18556
